A quick guide if you want to know how to screenshot on Mac
If you’ve recently bought a Mac and you’re still figuring your way around the various commands and keyboard shortcuts, you might have come across some simple ways of capturing screenshots. Screenshots are vital to capturing and sharing information and making life a lot easier when we’re in a rush.
It’s super common to use screenshots to show evidence of something, to share something we like with friends and loved ones, or even to show customer support there is a particular problem with something that we need to be fixed. However you use screenshots, the great news is that there are several easy and hassle-free ways you can screenshot on a Mac, making your life a lot easier when it comes to saving information.
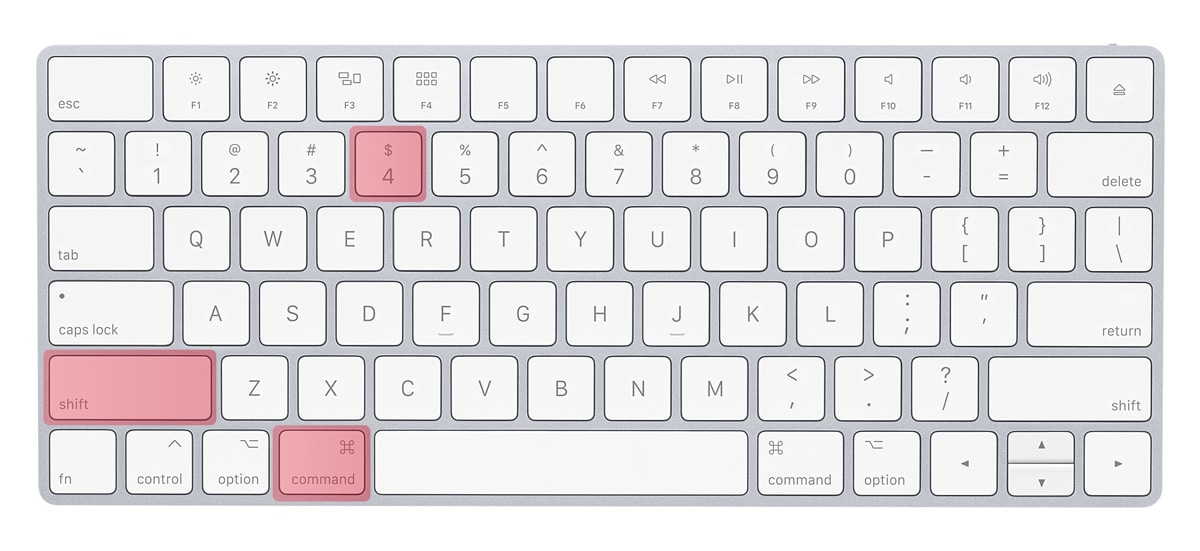
This is where it gets interesting. You can use this combination of keys to turn your cursor into a ‘crosshair.’ What on earth is a crosshair, we hear you ask? It’s basically just a little icon that you can drag to a specific portion of your screen to capture a screenshot. To screenshot, you simply release your trackpad to take the shot.
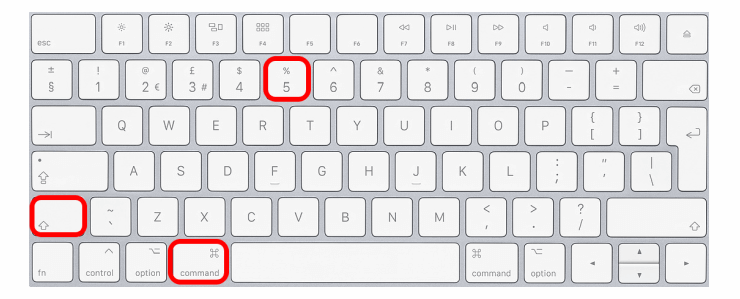
Option 3: Shift-Command-5
The third and final option that we’re going to introduce you to for screenshotting on Mac is Shift-Command-5. This was only recently introduced as part of MacOS Mojave (2018), so it won’t work on older models that haven’t been updated.
It’s also the most comprehensive option when it comes to taking screenshots on your Mac, as it brings up a control pad at the bottom of your screen with a number of capture options. You are able to either capture your entire screen, a single window, or a selection of your screen.
Even more impressive, you have the option of capturing a recording of your screen or a selection of it, using one of the two options at the bottom right of the panel. This is an excellent option if you want to screenshot videos or perhaps even yourself during a Zoom call, as it’s becoming an increasingly popular way of communicating right now.
Source: switchingtomac
Easy way to do
Another interesting component of the control panel that pops up when you press Shift-Command-5 is the options menu. This gives you much more control over the things you bring into focus on your screen and allows you to move items around before taking the shot, thanks to the five and ten-second delay options available to you.
The final thing to note about Shift-Command-5 is that you can change where your screenshots are saved. Helpfully, they are currently saved to the desktop as default, which is super helpful when you need quick access to them. But if you find yourself taking a lot of screenshots for a specific project, you might find it easier to save them in a particular location on your Mac.

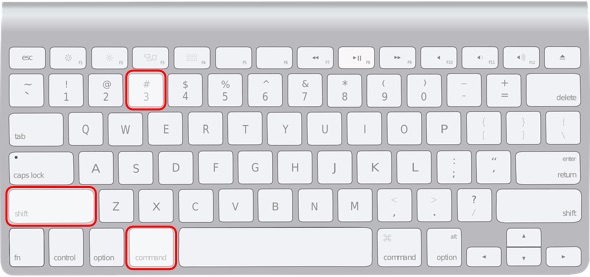
You might have noticed a pattern developing here! Apple has tried to keep things simple for you by programming the screenshot commands in chronological order, with 3 being the simplest way to go about it and 5 giving you the most control. It makes sense and indeed makes your life easier, as you don’t have to remember a load of complicated shortcuts to save your screenshots.
When it comes to Shift-Command-6, this is only available to MacBook Pro users who have a touch bar. This command enables you to take a screenshot of the touch bar, and it will save it to your desktop as a .png file that you can access in the same way you would a typical screenshot.
Conclusion
As you can see, Apple has made it pretty straightforward for Mac users to save a screenshot. If you’re just looking for a quick snap that you can share informally with your friends, Shift-Command-3 works perfectly fine. However, if you want added control over what you want to screenshot, it’s best to use the combination with 4 or 5, as this gives you flexibility about which part of the screen or which windows, in particular, you want to save.
Don’t forget that you can also change where screenshots are saved, which helps you manage the files on your desktop better and means you don’t have to spend time looking for important files.
We hope that you could learn that how to screenshot on mac. If you are a visual type of person, then we can recommend this short video for you to watch.
If you need a longer version, then we might recommend this one for you:
Do you want to learn more?
Click on the link below and learn many of our articles to solve every day questions.