How to draw a face
Practice
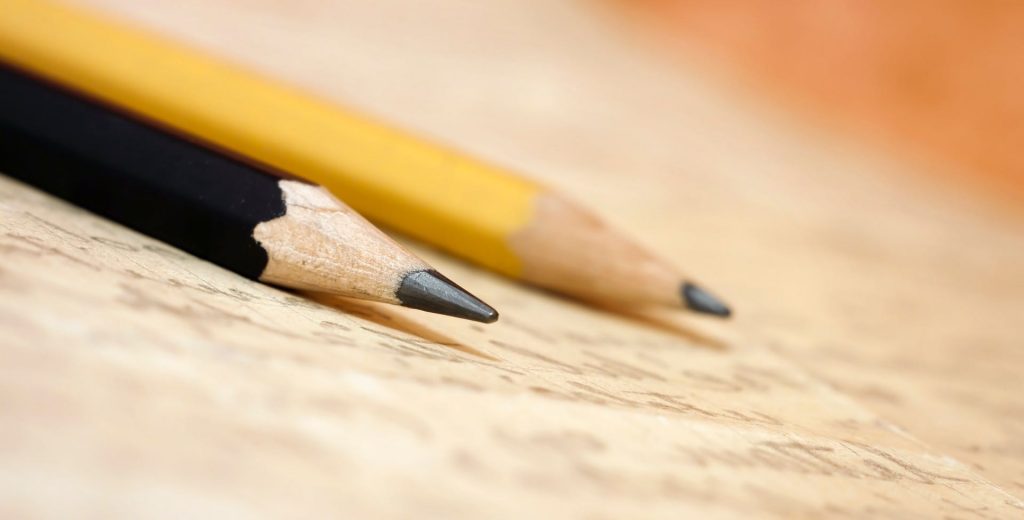
Before you start drawing, you will need to get large pencils to depict, draw, hide and place the fine subtleties.
Pencils and papers for portraits
Fyi: the letter “B ” means that the advantage is delicate, the larger the number, the softer the advantage. Delicate pencils give you a free, opaque line that is ideal for shading and blending. “H” means that the lead is hard. The higher the number, the greater the benefit. Hard pencils give you a clearer line and are for representing, incubating crosses and hiding other lights.
Another thought with drawing is the type of paper used. What you should be looking for is a superior corrosion-free paper, as it will help prevent your backward movement from fading in the long run. The Arteza drawing block 9×12″, 80 sheets-Pack of 2 is a surprising decision. It is compact in size and has a twist retention, which allows you to flip the cover and work on your drawing on a flat surface. Each page is punched in thumbnail to be removed efficiently every time you finish displaying or describing.
When you have your pencils and paper, it’s a great opportunity to draw! Reading the media carefully before you start will help you prepare.
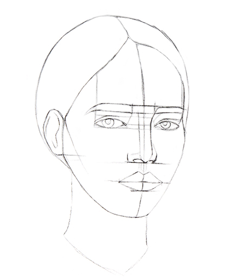
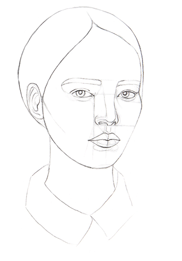
Step 1.
You will start by drawing the oval state of the face. Draw the jaw of the lady. Draw a line in the center. Locate a uniform line through the focal point of the ascending line, and then set the two additional limits of equivalent distance, one above the center line and the other below. These three equivalent parts show where the nose, eyebrows and hair will go. Make sure that the lines are separated at a similar distance on the basis that the extent of the face depends on it.

Step 2.
When you draw the face, even the lines also go as markers to reveal where to place the hairline, mouth and ears. From the line at the top, sketch the hairline. Add a short line on the face, about a quarter of the way between reality and the jaw line. This is the place where you draw the mouth. Draw the ears sitting between the two lines at the focal point of the face. To draw the highest point of the ear, use the center line where the most visible place of the ear will be and use the following minimum line as a manual to find out where the ear will end. Draw the neck.

Step 3.
This is an ideal opportunity to add eyebrows, eyes, lips and nose. Draw the eyebrows on the back line. To draw the nose, place the nostrils at the level of the lower part of the projection ear. At this point, draw the lips, using the short line as the gap between the upper lip and the base. Try to leave a little space between the lower part of the nose and the highest point of the lip.
To draw the eyes, place three lines on the midline for the upper and lower ends of the eye as well as the area inside the corners of the eyes. Make sure that the inner corners are opposite the outside of each nostril. Locate the end of the corner of the eye to the corner opposite the end of the eyebrow. Then add the eyelid and pupil.
The replacement is mostly at the focal point of the eye, however, leaning on the point of the face, it could very well be in a position a little to the side or to the left.
Step 4.
When facial reflexes are set, remove all support lines. Make the image more defined by adding folded lines inside the ears and characterizing the upper and lower eyelids, students, eyeballs. Add shadows to lips and ears for extra volume. Attract the filter, the small score in the middle of the lower part of the nose and the highest point of the mouth, making vertical lines opposite the width of the septum (the plot that isolates the nostrils). Draw the neckline of his shirt. For more sense of your face, use an H pencil to gently add cheekbones.
Step 5.
For emotional impact, use this strategy known as chiaroscuro to add strong differentiation between your darkest and lightest territories. You can use the HB pencil and hide the lining, leaving small white regions as features. Add shadows under the upper and lower eyelids. Use short strokes of pencil to add shadow under the eyebrows to give the face a more sensitive shape. Do the same with the lips, making the upper lip a little more blurred and leaving a whiter space in the spotlights of each lip, which is usually where they get the light. Add more shade under the lower lip, around and under the nostrils, and under the jaw in the neck. The shade will be darker along the jaw and inside the cervix.
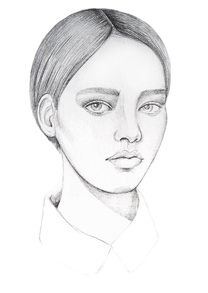
Step 6.
Final step to draw a face.
Make shadows much darker with pencil 4B. This brings more differentiation and emphasizes more subtleties, especially around the neck and neckline of the shirt. The way light hits the hair causes definition in the strands of hair. You can draw this and make the hair practical by using fluctuating and opaque lines of light, leaving a lighter segment to capture the appearance of the light radiating on it. Add a few lighter movements and blend into the skin. This will give the hair volume and feel less level. Darken the eyelashes to give the lady a deeper and more insightful look.
If you are a visual type of person, then we can recommend this short video for you to watch to learn how to make a paper aeroplane
If you need a longer version, then we might recommend this one for you:
Do you want to learn more?
Click on the link below and learn many of our articles to solve every day questions.